How to install TV Tuner Card and watch TV in Linux?

.

Installation and configuration of TV Tuner Card in Linux

As usual, there are many way to install and configure a TV Tuner card for watching TV in Linux. Here is a simple 'how to' for you – follow these step-by-step guide and watch TV on your Linux computer!

It is assumed that you had already installed the hardware, i.e. TV Tuner card in your computer with all the necessary cables and antenna/wire cable etc. You can do this yourself, as it is very simple – simply insert the TV tuner card in an empty PCI slot, if it is PCI based hardware. Please note that USB based TVTuner card may need some special tweaking, and hence it is better to stick to PCI based TV Tuner card if you want to use it in Linux. Many TV Tuner card now have Plug-n-play support in Linux too, and in all probability, all your necessary Kernel modules & driver will get installed simply by tools like kudzu (hardware install/remove wizard)when you first install your hardware.

After successful hardware installation, the next step involves installing software that lets you configure and watch TV. Again, there are many tools through which you can watch TV in a Linux system, but I recommend xatv. xatv is simple to install and configure, yet powerful application. It has many built in tool as well – such as screen capture and video recorder.

Installation of Xawtv

You can install xawtv in many ways. For more elaborate methods about application installation in Linux, please see this article –

How to install applications in Linux

You can find xawtv package for your specific Linux installation from various mirror download locations, such as.
.

.

Xatv source download :

http://linux.softpedia.com/get/Multimedia/Video/XawTV-370.shtml

For Fedora / Redhat, Suse, debian/ubuntu, you can download specific version of installable rpm file of Xawtv from:

http://fr2.rpmfind.net/linux/rpm2html/search.php?query=xawtv&submit=Search+...


Configuring Xawtv

After successful installation of xawtv, it's program icon may or may not appear on your application start menu. Ok, if you do not find its program start icon on start menu, do not loose heart. Start terminal, and give following command:

#xawtv

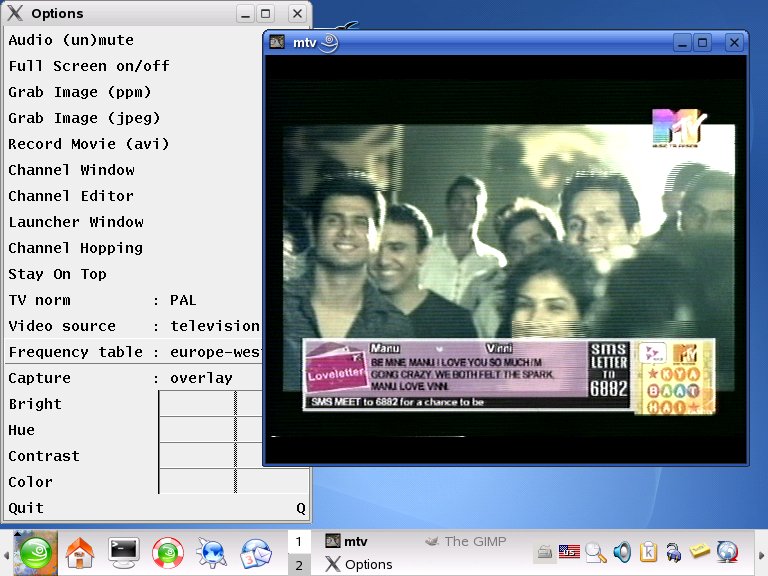
If xatv has been installed without any error in your computer, then it will fire up instantly. Now, right click on its window. An options dialog box will appear. Click on Frequency Table tab and select country of your choice. Select the Video source – it may be Television if you have connected TV Tuner card to an antenna or video RF cable. Further, select TV Norm – it may be either NTSC or PAL in general, and in special case, some other like SECAM. You can verify this through your cable provider or TV broadcaster. Any way, feel free to experiment a little, and you will be able to set it right.

Setting and Configuring Channel


On xawtv's options dialog box, click on Channel Editor button. A new, channel configuration window will appear where you can add all active channels. Name all the added channels with unique identifier – such as MTV for channel MTV, and click on Save button. Your TV Tuner card is now all set to entertain you nonstop. Simply click on xatv's window, and select the channel you want to see.

Advanced settings:


In Xawtv, you can change many default settings such as video, color, brightness and gamma settings for more viewing pleasure. There are Brightness, Hue, Color and Contrast settings. To increase these values, simply click on them, and to decrease right click on them.

Now sit back and enjoy your favorite channel non stop!

Related Article:

How to install Applications in Linux


How to add another language and keyboard in Ubuntu Linux

.

How to add another language and keyboard in Ubuntu Linux :


(Please click on individual pictures to see their large, readable image)

In one of my article, I had discussed - at length - how to install additional languages in Fedora core Linux, and in yet another one, I had given you some tips to install additional language and configure your additional keyboard in SUSE Linux. I had also given some tips to add languages in OpenOffice.org in this blog. In this article, I will tell you to how to add another language and keyboard in Ubuntu Linux.


Ubuntu Linux: Go for Painless Application Installations

With its latest version, Ubuntu has made new application installation virtually painless and extremely easy, provided, you have an active internet connection with a good speed. Well, now every Linux installations comes with application installer which resolve package dependency automatically, and do the job of finding and installing them for you in a breeze. Ubuntu is no exception, and at times, its brand new application installer beat others in many count. To install (or uninstall) an application in Ubuntu Linux, simply go to Ubuntu Gnome Desktop menu bar, then to Application button, hit it with your mouse click, and Select Add/Remove menu. After a short while, you will be presented with a list where you can choose to install/uninstall applications. Before hitting OK button, kindly ensure that your machine is connected to internet. For example, here, you can select Ubuntu Language Installer package from the given list. Depending upon the size of packages you had selected, and the speed of connection you have, the actual time taken in installation of application may very. Broadband connection are now real cheap and available a plenty, thus for installing an additional language like Hindi, all it needs mere 15 Minutes with a 256 Kbps broadband connection.

.

.


Installing Additional Language Environment in Ubuntu Linux is a few click's affair:

To install additional languages in Ubuntu Linux, there were special, easy language installer program given in Ubuntu Linux version 6. To start Language Installer program, go to Ubuntu Gnome desktop menu bar, then point to System > Administration > Language Support. A small language will appear where available supported languages were listed. Select the languages you want to install and configure in your Ubuntu Linux, and click Apply button. Before hitting OK button, ensure that your Internet connection is up and running.

Ubuntu application installer will now search for all necessary files across mirrors, establish connection, and then install all the packages automatically for you. After completion of installation, you can login to that newly installed environment even without a system reboot.

Installing Additional Language Keyboard in Ubuntu Linux:

There are several methods - a classic feature of Linux to do a thing in many decent way! For your traditional, default Input method, simply go to Ubuntu Linux Gnome Desktop menu bar, then go to System > Preferences > Keyboard. A keyboard preferences window will appear where you can select additional language keyboard from Layouts tab. Layouts are beautifully listed country wise, and to install additional language Bengali (India), you can click the small arrow icon beside India and then select Bengali. Click OK button and you are done. Here, you can change many default settings such as group behavior, keyboard shortcut to invoke the newly installed keyboard etc. By default, you can toggle between keyboards through Alt+Shift or both Shift keypress (you can change that and make your own custom shortcut through Language preferences), or by clicking the language icon available now in menu bar.

Another method to install and configure additional language Keyboard in Ubuntu Linux (or, in any other Linux you can say,) is to use advanced input methods like SCIM (Smart Common Input Method) and IIIM (Intranet and Internet Input Method). Using and configuring these for additional language needs another article, and we will discuss these later. So watch this space!

**-**

Cartoons of the week...

.
Is God man? Woman? Or is a CHAKKA?

Netas all set to have multiple pension for their deeds...

.

.
While taking that catch, that basterd Adese mosquito bite me... else there will be another tale for this match..
Railway hiring food inspectors? They force you to eat the supplied food else...


Research papres were mere copy of Net content. But, then, for what purpose Net is meant for?


Tag: , ,,

How to install and configure additional language in SUSE Linux?

.

Here is a no-nonsense, step-by-step guide for you to install and configure additional language in SUSE Linux.

Installing Additional Language pack:

Scenario one: You have SUSE distribution CDS / DVD., and have already installed Linux with KDE Desktop.

Step 1 : Put your CD / DVD in your drive. It should auto mount in SUSE 10 or above with default settings. Else, mount it.

Step 2 : Start Konqueror (or any other file manager), and brose the CD/DVD to find KDE language package for your language. For example, if your language is Tamil, hunt for the package: kde3-i18n-ta-3.5.1-9.noarch.rpm in the CD/DVD. Generally, SUSE KDE language packages are stored in cd/dvd's ‘/suse/noarch' directory.

Step 3 : You need to install this package. You can do package installation in SUSE in several ways. Some of these are:

(A) Click the KDE language package file within Konqueror window. For example, to install Tamil language in SUSE, click the file - kde3-i18n-ta-3.5.1-9.noarch.rpm which you can find in SUSE installation CD/DVD in the directory /suse/noarch. Konqueror will then start the default, associated application installer, and will install this package automatically for you. You may need to supply root password.

(B) Click on SUSE start menu. Go to System > Configuration > Install Software. SUSE software installer will start and it will present you available installable software in a window which were available in your SUSE installer CD/DVDs. Go to KDE language pack entries, which looks like - kde3-i18n-ta (say, for Tamil language). Select this by clicking the selection box beside it. Click on Install button, and you are done.

Scenario 2 : You do not have SUSE installer CD/DVD, but have Internet connection.

Step 1: Connect to Internet.

Step 2: Click on SUSE start menu. Go to System > Configuration > Install Software. SUSE software installer will start and it will present you available installable software in a window which were available in SUSE installer directory tree in Internet server. Go to KDE language pack entries, which looks like - kde3-i18n-ta (say, for Tamil language). Select this by clicking the selection box beside it. Click on Install button, and you are done. Alternately, you can go to:
http://software.opensuse.org/download/KDE:/KDE3/SUSE_Linux_10.1/noarch/

and find your KDE language pack there. Download it in a safe location, and install it by any of the above mentioned method.

.

.

Configuring for Additional Languages :

Simply installing additional language pack in SUSE Linux will not make any usable settings in your Linux desktop. You need to change them manually to take effect. To change your GUI Language Environment in newly installed Language, click on Start Menu, go to Personal Settings > Country / Region & Language. Here, you will find a settings window having many setting tabs. Click on Locale tab. You will see a default language (or more if you have installed them earlier) entry under Languages section. Now click on Add Language button. If you have successfully installed KDE language pack for your Language, say, Punjabi, then it will appear here. Simply select it and click Apply button. You have now added additional language in your system. If you want to set all your applications GUI settings in this newly installed language, then you need to move it up in the first position through Move Up button, since, by default, the newly started application in KDE will start only with the language specified in first entry. However, you can start your application in any installed language by specifying language parameter while giving application start command through terminal. For example, if you want to run KATE in Tamil, start KATE by giving following command in any terminal:

$ LANG=ta_IN.UTF-8 kate

In some case, you need to install language specific font. For this, just make a folder name .fonts in your home directory and copy at least one language specific Unicode font in it. You will see, your KDE application KATE has been started in the language you have chosen.


Configuring for additional language keyboard :-


To set keyboard layouts in SUSE, click on Start Menu Button, then click on "Personal Settings". Select "Keyboard Layout" on the right pan. Select check box "Enable Keyboard Layouts" on the left pan. You will then be presented with all the available keyboard layouts installed in the system. Select the additional languages you want from Available Layout , for example, Tamil, and click "Add >>" button. Newly selected language will then appear on Active Layout section. Click on Apply to apply changes. A small language icon will appear in menu bar, and you can toggle between Input languages by simply clicking over it.
Your SUSE Linux machine is now ready to work non stop in a new, additional Language.


India No. 1

.

We all have hidden desire to be always at No.1 position . India is also No.1 in many aspect. India is again No. 1 this time - it is no.1 in paying bribe! .

Congrats! After all, we the Indians are only to blame for this Position!
.

.

Why to use XFCE in Linux?


XFce : A cholesterol-free Linux Desktop for u

The Heavy Weight desktop environment GNOME and KDE with all their functionality and pretty, many-many useful utilities have made their place as default desktop environment for most Linux installations. But the biggest disadvantage is that they are real BIG in all aspect and therefore, hog system resources – from memory to processing power. In some low end system, due to their heaviness, KDE and GNOME may take much time to load, occasionally freeze and may crash the system. Even the applications in these environments take time to load and tend to run slow due to less system resources availability. The light weight, very basic type window managers like twm, fvwm etc. are not glamorous enough in use, they fail to visually appeal and even nerds feel strange in these environments. Well, a promising new Desktop Environment, called XFce, built on powerful GTK2 tool, but really very light in weight and simultaneously visually appealing; is emerging fast and may one day will become one of the most preferred desktop environment for Linux ( it works in other *nix system as well) systems, not only for old or low end systems, but for fast system too, since it has some built in extra, extremely useful functionalities too. XFce is fully compliant with Freedesktop standards and has built in native interoperability with GNOME and KDE.

New, intuitive Menus:

XFce version 4 was recently released which supports more than 18 Languages including Indian languages- Tamil and Hindi, and many more are in pipeline. XFce is extremely light in initial loading and does not burden your system while it is running. It has new, intuitive Main panel that can be made visible or Auto-hide and very is easy to configure. Main panel has Detachable, collapsible / dropdown Menu that can be oriented horizontally or vertically. It works through XFwm, the window manager of XFce. You can group menus according to their area of functions, for example, in one group, you can club application launchers for Web and Internet such as- Internet Dialer, web browser, E-mail client etc. and so on. XFwm can give you unlimited multiple virtual desktops that you can use for each project or application. The XFce window manager has more than sixty windows decorations, and it also supports menu bar shadings and desktop switching etc.

XFtree the fastest file manager

XFtree is a new file manager from XFce that is light weight, yet have nearly all functionality built in for all file management requirements. It has support for Copy-Paste and Drag-Drop operations. You can set file properties through it and it has built in file compression and de-compression capabilities. XFTree has different, new concept of trash management- it put waste basket in every directory where it is required, instead of single Recycle-bin to put all your trash files. It is similar in representation that a large building has many rooms and every room or segments of rooms have their own trash basket in their rooms which are periodically emptied in a large trash bin put in building's alley. This concept helps in finding files easily which are deleted accidentally. Similarly, in XFtree, files from all waste baskets are collected in trash bin. The tabulation of waste basket is done automatically, which can be switched off. This is definitely a better way of trash management; and it can manage trash from GNOME and KDE's trash bin also.


XFsamba

XFce comes with a samba file browser XFsamba, that works on top of Samba, but gives you true Windows network type connectivity and file browsing facility of Windows workgruop computers in Linux.

.

.

XFglob

XFce comes with module and plugins that enhances its functionality and at the same time, this concept makes XFce extremely light. For example, when you do not use file search facility, its module, XFglob does no load with XFce, and when you call for search operation, then only it will load and after its file search operation is once over, it will unload itself from the system. Xfglob is a file and directory search module for XFce and it is truly fast in working.

Plugins for XFce:

XFce supports plugins, which enhances its functionality and that loads and offloads dynamically so that XFce remains light in operation. There are many useful plugins for XFce that can be installed separately. When installed, they integrate with XFce and works as native part of XFce windows desktop environment. Some of notable plugins are:- xfce4-systemload plugin that shows status of current CPU load, memory and swap space use. xfce4-minicmd plugin lets you run commands directly from panel. It creates a small input window inside panel in which you just have to key-in your commands and hit enter. Your commands will run from there. There is xfce4-toys plugin that has some utilities like tips, fortunes, xeyes etc., xfce4-netload plugin shows the load across your network. There is a nice plugin for managing clipboard that supports clipboard history- xfce4-clipman plugin. These and many more plugins together with its native goodies make XFce a complete desktop environment. Download and install this free Desktop environment from http://www.xfce.org to remove some fat off your Linux installation and give the new lease of life to your old system or pump extra adrenalin to your latest P4.

Screenshot Descriptions:

  1. XFce01.jpg XFce is so light hat even heavyweight graphics applications loads faster and works smoother even in very low end system. It also has many dropdown menus represented by uniquely identifiable icons in menu bar, which can be neatly arranged and grouped for better use.
  2. XFce01.jpg XFce comes with its own file manager, XFtree that is light, yet has all modern file management capabilities like drag & drop, copy & paste and have capability of file compression-decompression etc.
  3. XFce01.jpg Use ‘Dillo’ the slimmest browser of its kind with XFce and your computer will work as turbocharged.
  4. XFce01.jpg XFce has XFsamba, the file manager that lets you work seamlessly with networked Windows Workgroup computers.
  5. XFce01.jpg XFglob, the fast and efficient file search utility for XFce works independently as well as with file manager XFtree.
  6. XFce01.jpg XFce has more than 60 windows decoration style built in, which can be further tweaked since it supports windows shading etc.
  7. XFce01.jpg XFce supports scalable / customizable view in all its windows.

How to install additional Language packs and change default Language in Open-Office.org?


Working with Languages in OpenOffice...


How to install additional Language packs and change default Language in Open-Office.org?

//*//

OpenOffice.org is a free office suit that also comes in many languages. OpenOffice is available for almost all platform – from Windows to Linux and from Intel to Sparc. To use OpenOffice in language other that English, you have to download install the complete distribution released specifically for that particular language (if it is available). A better option is to install the default English language OpenOffice base installation, and then install the additional language pack for the language(s) you wish. You can install as many languages as you wish, provided there were language specific installation files available.

Here is a brief guide for you to setup OpenOffice in your own language – Language other than the ‘default’ English.

OpenOffice.org’s latest, stable version is 2.03 that you can download from –

http://download.openoffice.org/2.0.3/index.html?focus=download

The other development version is 2.04-rc2, where you may find some additional language pack. For a complete list of available packages, follow this link:

http://oootranslation.services.openoffice.org/pub/OpenOffice.org/2.0.4rc2/

Further, base installation package is also available with JRE (Java Run Time Environment) and without JRE. With JRE, it is about 120 MB download, whereas without JRE, it is about 90 MB download. If you are not sure about JRE, better opt for complete installation with JRE, as some of OpenOffice’s functionalities are heavily dependent on JRE . Note down the base installation path of OpenOffice. If you have choosen the base pack installation in a particular language other than English– for example – French or Russian, then your OpenOffice.org’s default language including its GUI will be available in that language – e.g. French or Russian, and you need not do much to change its settings as most of the default settings will suit for that language.

But if you want to install Indian language – for example, Hindi or Gujrati, then you have no option (however, you may find some versions of complete installable files in Indian languages at some specific sites, but not on OpenOffice’s) but to install the base pack in English (or any other language if you are comfortable with) and then install language packs additionally. Language packs are about 15 MB download.

For example, Hindi language pack is available for download at:

http://oootranslation.services.openoffice.org/pub/OpenOffice.org/2.0.4rc2/OOo_2.0.4rc2_060913_LinuxIntel_langpack_hi-IN.tar.gz (for Linux)

and

http://oootranslation.services.openoffice.org/pub/OpenOffice.org/2.0.4rc2/OOo_2.0.4rc2_060913_Win32Intel_langpack_hi-IN.exe (for Windows)

.

.

These files are precompiled, installable program and gets installed easily. You need to install them in the folder where OpenOffice is already installed.

After installation of Language pack, start OpenOffice, then go to Tools>Options. A setting window will appear where you can set different parameters of OpenOffice including its default language.

Now click on the small ‘Plus Sign’ on the right side of ‘Language setting’ to expand the available setting option. Select ‘Languages’. Further selection box will appear after a while. Click on dropdown list opposite ‘User Interface’. All the installed language will appear here. If you have correctly installed, then your additional installed language will appear here. Select this and click OK to apply. Here, you can also set default language for your documents too. The language setting will take effect after restarting the application. If you want, you can change other language settings such as Locale and Currency too.

OpenOffice’s Language Packs are available for these Indian languages: Assamese, Gujarati, Hindi, Malayalam, Marathi, Oriya, Panjabi, Tamil, and Telugu.

Own your own Government by makig it for yourself!

Khud ki Sarkar?

The clipping in Hindi has a news item where some villagers have made their own Police Thana due to inaction from Govt....


.

.