How to Read / Write access Windows NTFS partition in Linux

.

How to mount and access Windows Ntfs partitions from Fedora / RedHat Linux?


Most Linux users dual boot in to Linux as well as Windows. At times, we need to access files of Windows partition while working in Linux. Many new Linux Distributions such as Ubuntu and Mandriva have built in facility to full read/write access to Windows FAT 32 pratitions and read only access to Windows NTFS partitions. But these facilities are not available on default installations in Linux Fedora core or RedHat Enterprise versions due to security or other - Licensing reasons. Here is no nonsense guide for you to how to access (full read write support to Windows FAT 32 as well as NTFS partition, which you can use in other distributions as well) Windows FAT 32 / NTFS partitions in Fedora core / RedHat Linux.

Please note that the commands given in this article must be run as root user.

Step 1: Know the partition that contains Windows FAT / NTFS partitions:

To know which partition contains Windows FAT 32 / NTFS files, give following command:

# /sbin/fdisk -l

The output will be like this:


Precisely note down the partitions which contains Windows file system that you want to access. In general, it will be hda1 (for IDE drive c), and if you have many partitions and more than one hard disk, then it may be like hda2, hda3, hdb1, hdb4, hdd1 for IDE disks (and for SCSI disks, it will be like hdc1, hdc2) etc.

Step 2: Create mount point directory for Windows partitions:

If you have Windows partition say, hda1 (for drive c in Windows) that you want to access, then create a sub directory c in directory /mnt by giving following command:

# mkdir /mnt/c

In this directory, your Windows files will be available for use in Linux after mounting this file system.

Case A - To access Windows FAT 32 partitions : (For Windows NTFS partitions, skip this section and Jump to Case B)

It is simple. Linux Kernel has built in read-write support for FAT file systems. You simply need to create a Windows mount point directory and mount that directory either manually or automatically during boot time.

Case A - Step 1: Mount Windows FAT 32 partition hda1 for read / write access:

To mount newly created Windows mount point directory, you need to add information in /etc/fstab. Start any text editor as root user, say, gedit by giving following command:

#gedit /etc/fstab

Now add following line at the end of the file. AND be sure that there will ALWAYS be a new line at the end of the file - i.e. after entering this line, press return (enter key) key once.

/dev/hda1 /mnt/c auto defaults 00

save the file.


Now give following command:

# mount /mnt/c

There should be no error message if you have done everything right. Now you can browse Windows Dirve C (having FAT32 file system) in Linux in directory /mnt/c through any file manager like Konqueror.

Next time when you boot in to Linux, Windows partition hda1 on /mnt/c will automatically be available to you (that you can change by giving suitable argument in fstab entry)

Case B: To access Windows NTFS partitions:

Currently, Support for Windows NTFS partitions in Linux is available through various kernel modules and drivers. You may opt for module ntfs or driver ntfs-3g with fuse module or some other but you need to configure Fedora / RedHat to load one of these module first and then access Windows Partitions.

Case B Step 1: Install ntfs-3g driver to access Windows ntfs file system

It is recommended to use ntfs-3g driver since it give you full read-write NTFS access and is mostly 'serious-bug-free' and is now pretty robust. You can download and install the suitable RPM package (be sure to download and install ONLY that package MEANT for your Fedora / RedHat kernel, otherwise it will NOT WORK!) from here:

Download ntfs-3g from 'rpm-find.org'


for fedora core 5, download link will be:

ftp://rpmfind.net/linux/fedora/extras/5/i386/ntfs-3g-0-0.5.20070920.fc5.i386.rpm

You will need to install fuse package the upperspace file system kernel module since ntfs-3g depends on that. You can download and install suitable fuse package from:

Download fuse from rpm-find.org


for fedora core 5, download link for fuse rpm package will be:

ftp://rpmfind.net/linux/fedora/extras/5/i386/fuse-2.6.0-2.fc5.i386.rpm

How to install these RPMs?

Simply give following command

#rpm -ivh <file-name>

For example,

#rpm -ivh fuse-2.6.0-2.fc5.i386.rpm

Will install package fuse-2.6.0-2.

You can Refer this detailed article for further assistance:

http://raviratlami1.blogspot.com/2006/07/installing-applications-in-linux.html

.

.

A better way to install ntfs-3g and fuse kernel module is to build it from their source. Download fuse source from here:

http://belnet.dl.sourceforge.net/sourceforge/fuse/fuse-2.5.3.tar.gz

and ntfs-3g source from here:

http://www.puptrix.org/sources/alphabetical/n/ntfs-3g-20070822-BETA.tgz

First untar theses files by giving command:

#tar -zxvf fuse-2.5.3.tar.gz

for fuse and,

#tar -zxvf ntfs-3g-20070822-BETA.tgz

for ntfs-3g.

Now go to directory fuse-2.5.3, and give command:

#./configure

If you have installed all the required development tools, then it will run successfully, else you will get error messages. After successful completion of this command, give following command

#make

and finally, give command-

#make install

Repeate this procedure to install ntfs-3g.

Case B Step 2: Configuring and starting kernel module ntfs-3g

Give command:

#modprobe fuse

If fuse module is successfully installed, then it will produce no error message. Now you can mount your ntfs partition by giving a simple command:

#ntfs-3g /dev/hda1 /mnt/c

provided that hda1 has ntfs file system and you already have created mount point /mnt/c as discussed in Step 2 above. If the command does not produce any error message, then congratulations! you have successfully mounted Windows ntfs partition for read / write access. Start any file manager like Konqueror and browse /mnt/c as you browse in Windows Explorer.

If you want to load fuse kernel module automatically during boot time to automatically mount ntfs volume, append following line

modprobe fuse

to the file /etc/sysconfig/modules/udev-stw.modules

and add following line to /etc/fstab

/dev/hda1 /mnt/c ntfs-3g silent,umask=0 0 0

Now your Linux machine is ready to mount Windows ntfs partition during boot time.

Happy browsing ntfs in Linux!


***-***

How to install and run Windows applications in Linux?

How to install and run Windows applications in Linux?


Some, not all Windows applications were running quite comfortably in Linux since long. I had written a “how to” some years ago, which you can refer how things had evolved. Running Windows application in Linux was indeed a difficult task then. It is quite easy now. In fact, project WINE is matured enough now that recently, it had been released for the first time for public use. Parallel to WINE, there is another nice, advanced tool that extensively use and contribute to WINE is Codeweaver’s CrossOver Linux that also lets you install and run Windows application in Linux. If you are new, it is recommended to use CrossOver, since it is advanced, has nice interface and handles installations and running Windows applications in Linux well. For $40.00 for standard version. It is quite economical too.

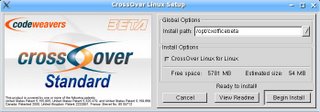
Installing CrossOver Linux is very simple. Download this 60 day demo from Codeweaver’s site and give command-

./ install-crossover-standard-prerelease-6.0.0beta3a.sh


And follow on screen instructions. Installation will hardly take more than 5 minutes.

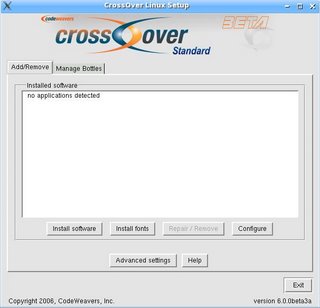
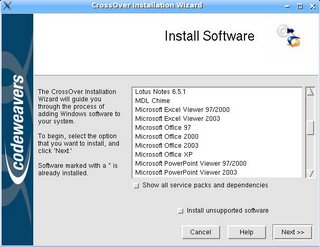
A CrossOver menu will be added to your start menu. To install Windows applications, go to Start Menu > CrossOver > Install Windows Software. A CrossOver application installer will appear and guide you how to do it.

.

.

After successful installation, Windows application’s menu will appear in Linux start menu, which you can run through standard way.

You can see the list of supported and tested Windows application that can run on Linux through CrossOver. The list is not exhaustive, and you can run many more than listed above.


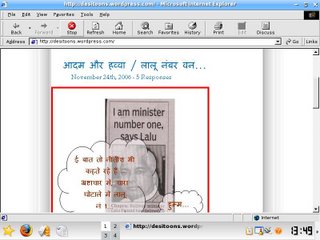
(See above picture: Microsoft Internet Explorer running in Linux)

But, beware and be prepared to get occasionally bizarre behavior from Windows applications running in Linux!

How to make your PC a multi-boot heaven?

.


Make your PC Dual / Multi boot with these easy steps...

In my opinion, no computer is complete unless it has more than one Operating System installed.

If you are using Windows, you are deprived of security and geek-ness of Linux and if you are die hard Linux fan and ‘Windows' word makes you uncomfortable, hold your breath, there are billions of nice applications you can't run anywhere else other than in Windows, so have one installed in your computer ASAP!

In a way, Dual/Multi boot PC is the need of the hour.

Here is no nonsense, step by step guide for you to make your PC multi-boot heaven.

Warning: Some instructions given here, though are non-destructive in nature, and your data will remain safe, still, some inadvertent move may make your PC in an un-bootable state. So, proceed only if you think you know what you are doing! Absolutely no liability and no warranty! Thanks. :)

Step 1 Write down your Disk stats:

You need at least two partitions in your hard disk for a true dual-boot machine. For a multi-boot machine, you need as many partitions as many Operating System you want to install. There are workarounds to install multiple operating systems in single partition. You can install another operating system either through virtual machines like vmware or by making a large file (in some cases, such as Mandriva Linux) that works as a partition but you will not get true working environment and at times, they hinder performance of base, installed operating system.

If you already have one or more free Partition, you can skip to next section, otherwise read on:

Step 2 Create additional partition for additional OS

If you do not have at least one free partition for an additional OS, then you need to create one. If you have only one hard disk installed, then it is a good idea to buy another one with fairly large capacity - say, 80 GB and partition it in more than 2 and use it for your new OS. If you have fairly large amount of free space available in your existing Windows installation and you do not want to buy another one (or have already installed a second hard disk!), then you can create a partition in the free space. To create a partition from Dos-Windows free space, you can use a free partition utility FIPS. If you want to create additional partition in free space available in Windows machine, then first defragment it and then use FIPS. It is simple in use, non destructive (i.e., your data remain safe if you handle it wisely) and hugely popular. If you think partition funda is a bit technical, then you can ask one of your tech friend to help you out in creating one for you.

Step 3 Install additional OS in new, empty partition

Now, you have created (or you already have one) an empty partition for an additional Operating system. Install additional operating system in this empty partition by standard way. If you are installing Linux on an existing Windows installation, (though Grub / Lilo boot-loader of Linux can easily handle booting Windows through MBR) it will be a good idea to install Linux boot loader in the first sector of root partition where Linux is being installed. To boot multiple OS, it is always a good idea to use third party boot loader utility like XOSL. XOSL can boot over 30 Operating System from same computer. This way, any further change to MBR or changes on boot record of root directory (when you install another OS or uninstall/remove existing one) of partitions will make no effect in boot record and process, and your machine will remain in nice, bootable state.

Step 4 Install boot loader XOSL

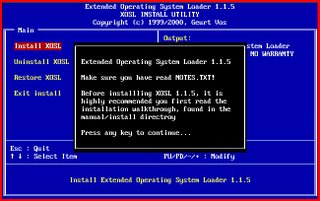
Download and extract XOSL in an appropriate Windows directory. Run install.exe, the XOSL installer from the extracted files.

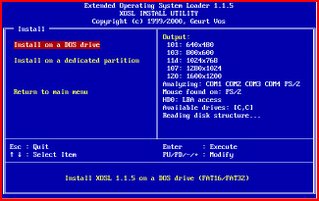
XOSL will ask you where to install. Select on dos drive C, and follow on screen instructions. When done, you will need to reboot the machine.

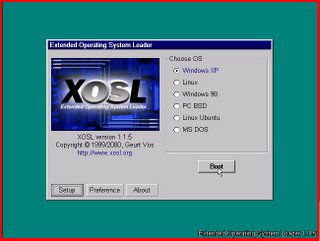
After reboot, you will see XOSL boot selection screen. You need to setup XOSL for the operating system you have installed ( or going to install) in various partition.

.

.

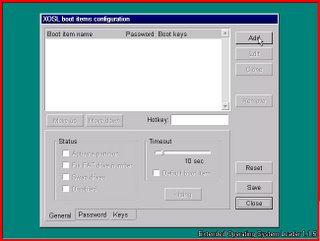
Click on Setup button of XOSL screen.

In the next screen, click on Add button. XOSL will automatically scan for available bootable partition, MBR, floppy, CD disk drives and will present it in selectable window. Select the one you want to boot in to and give it a name. For example, HD0 partition has Windows, so give it a name Windows, and click Apply. Repeat the step to add all the available operating system and partition. You can add entries for empty partition too - where, in future, you may install Operating Systems. When done, click on Save button, and then click Close button.

Finally, you are ready to boot in to the OS of your choice!

With XOSL installed in your computer, you can install over 30 operating system in the same machine. OS like Linux can record boot information on first sector of partition, and hence can easily be managed through XOSL. But when you install or reinstall Windows, XOSL gets overwritten by Windows default MBR. In this case, you need to restore an already installed XOSL.


To restore XOSL, again, run install.exe of XOSL, then select Restore XOSL with the help of arrow keys and press enter. Follow on screen instructions, and you are done. Simply reboot the machine and everything will be back as ever!

How to toggle between language environment in Linux...


Linux : How to toggle between languages ?

Well, you setup your Linux machine for many languages. Now you want to toggle between them - just for using them in different environment or, if there is need, toggle between different languages keyboards.

Here is how :

Toggle language environment in KDE :

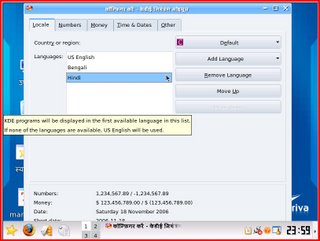
As usual, in true Linux style, there are a hundred way. But the most easy is click on K-menu, then go to Control Center and click on it. The KDE settings window will appear where you can set various parameters of KDE including language settings. Here, go to Regional & Accessibility > Country - Region & Language.

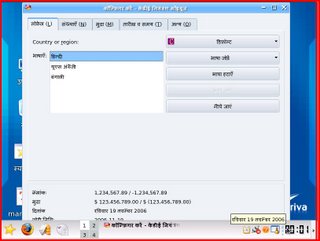
Here, you will find various tabs for settings in right pan. Click on Locale tab. Now, select the language you want to apply, and keep clicking on Move Up button till that language reached to the top most position (when it reached to the top position, the button will be grayed and will not remain clickable anyway)

All new application will be started in the new language environment. When you want to toggle back the language, just repeat the procedure, and bring back the old language to top most position again.

.

.

Toggle Keyboard (in KDE as well as in Gnome):

Please Read this Article.

Toggle Language environment in Gnome :

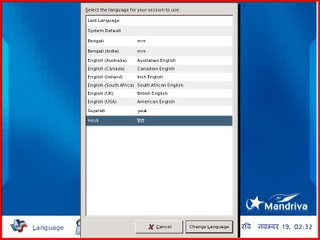
Again, there are hundreds of way you could do it in Linux. But the most easy way is to logout and login through gdm (the Gnome Display Manager). On Gnome login screen, select the language environment you want from Language selection tab, and simply log in. It is as simple as that. To toggle back to the old language, simply logoff and choose old language.

If you do not want to bother about logging of or do not know which environment you are in, then, simply give following command to run any-application (say, gedit in the given example) in the choice of your language (provided that the language Locals are installed) :

# Lang=en_US gedit (this will start gedit in US English environment)

# Lang=hi_IN gedit (this will start gedit in Hindi India environment)

But, note that you can run multiple instances of a program in only one language. It means, you cannot run gedit simultaneously in Hindi and English both languages. You can run any application either in Hindi or in English or in any other chosen language, irrespective of Linux desktop environment language.

Happy toggling!

*******

How to setup Multilingual Linux Mandriva 2007?

Mandriva 2007 : One of the best option for your multilingual Linux Desktop.


Mandriva Linux 2007 supports more than 65 languages including some Indian languages like Hindi, Gujarati, Punjabi, Tamil etc., and many of these languages have support right from the first installation screen. That means, you can install or upgrade your Mandriva Linux 2007 in your chosen language environment. Here is how to setup Mandriva as a true multilingual Linux box.

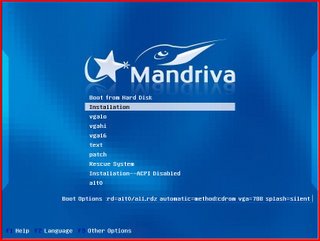
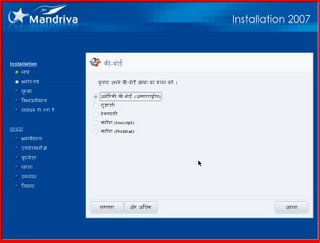
In the very first installation screen of Mandriva (as shown in figure below) press F2 to invoke language selection box.

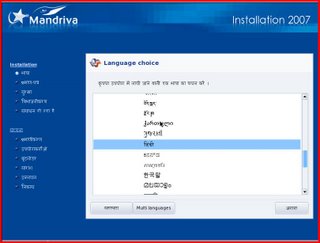
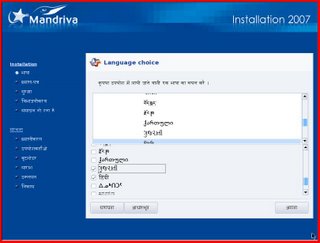
In the next screen, you will see the available supported languages in Mandriva 2007. Browse for your language and select it, and if you wan to set Mandriva for more than a couple languages, then click on Multi Languages tab. Select as many languages you want to install by selecting check box against the available languages.

Remember to keep select the Keyboard language setting to English since the terminal commands may not available in other languages.

.

.

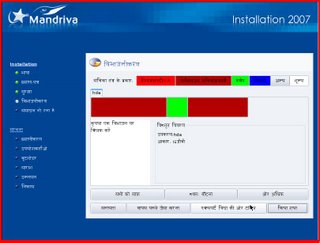
Mandriva's disk partition utility is one of the best and simplest. And is available in your chosen language if Mandriva installer is available in that language.


Mandriva 2007 has some bug as far as Hindi (India) Language is concerned. The language environment and Hindi locale does installs, but Hindi font not, and what you see are disturbed text in Gnome and empty boxes in KDE. Hence you need to install a Hindi Unicode font additionally. Just copy a Hindi Unicode font to /usr/share/fonts/TTF and then run command - chkfontpath to install Hindi fonts properly.

How to convert digital movie (.mov) files in to Video CD (*.dat) format?

Converting digital video *.mov file to Video CD *.dat files.

Digital Cameras have redefined the way we take pictures and record our videos. Most of us now use Digital Camera for one or other reasons. High end cameras now come with built in Video CD / DVD recorder. But there are many cheap cameras that come with simple camcorder that records movie in Quicktime *.mov format.

You can watch the video contained in the *.mov files through a computer by some media player capable to play QuickTime *.mov files. But not in simple VideoCD Players. What to do if you want to play and watch in some hardware TV-Video-CD player?

Well, there are dozens of tools that you can use to convert and record your digital *.mov files as Video CDs. Some nice tools comes with many beautiful features, such as built in VCD burner/recorder. But if you have Nero, the utility to write CD-ROM, then you can very well use a nice, freeware utility called Media Coder to convert your digital movie *.mov file in to JPEG Full motion 25 fps picture.

Here is step-by-step guide for you to do this:

  1. Download the latest, free version of Media Coder from here :

http://mediacoder.sourceforge.net/

and Install it in your computer.

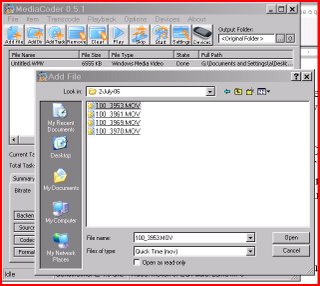
  1. Start Media Coder, then click on Add File button. Select the file you want to convert, and Click Open.
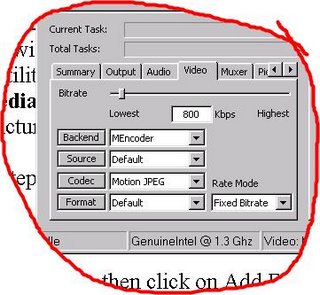
  2. Select the File in Media Coder window and then click on Video tab that is there on left bottom side of window. Click the dropdown button meant for Codec button, and select Motion JPEG.
  3. Do not change other settings unless you know what you are doing. There are hundreds of settings you can tweak if you are advance user. But any wrong setting may give you unpredictable result such as wrong audio stream etc.
.

.

Further, then-
  1. Click on Start button on Media Coder main menu.
  2. Depending upon the size of your digital movie, it will convert the movie file format in a few minutes. Just relax and have some tea/coffee.
  3. After conversion, it will display a dialogue and if it fails, it lets you know what went wrong. If it gives you successful message, then your converted file is ready to be recorded as Video CD *.dat format by Nero. Media coder can convert many media files in to one another.
  4. You can add as many file you want for conversion in one go by selecting multiple files.
  5. Now, start Nero. Note that the method given here may slightly vary depending upon the version of CD Recorder utility you are using, But these are pretty simple and alike. In Nero Express 6, in ‘What would you like to burn' selection box, select Videos/Pictures>Video CD.
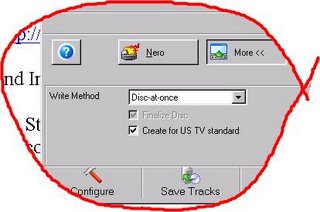
  6. Click Add button, and select the converted file(s) which may have same name, but with a new extension - *.avi. Keep clicking Next button to accept default setting if you do not want to change anything, and insert a blank CD ROM disk when asked for it. In a while, Nero will finalize Video CD complete with menus and record it in the disk supplied by you. Remember, in video configuration, you must select NTSC/PAL - which ever format your Video-CDPlayer supports. For India, it must be set to PAL. For this, please de-select Create for US TV Standard check box.
  7. Your Video CD is now ready! DO not forget to test it before sending it to someone.

Queries? Comments? Just hit the comments and have your say!

***-***

Some more desi cartoons...

.
Here are some more desi cartoons...


.

.

You can see some more cartoons here


.

.

Indic Blogger award IndiBloggies 2006 is ready to rock...

Are you ready for IndiBliggies 2006 Awards?

The prestigious Indian Blogger award, IndiBloggies 2006 is all set to rock & roll! You can yourself indeed be a very part of IndiBloggies 2006. Just think for ‘any' or ‘all' of these and more: -

  • You can register yourself as a Jury!
  • You can sponsor a grand prize ! Or, at least, you can nominate your favorite Blog, go vote for it and beg vote for it mercilessly!
  • You can suggest Catagories, the WAY winners should be chosen, and what not!

IndiBloggies awards are way better than Microsoft-BhashaIndia IndicBlogger 2006 Awards. Microsoft BhashaIndia 2006 awards witnessed many discrepancies, which cannot be termed at all as professional! Some basic points were not taken in account by BhashaIndia while deciding for Hindi blog award category. Goodies as prizes by BhashaIndia were also not up to the mark! In fact, IndiBloggies had disbursed more valued prizes during 2005 than BhashaIndia 2006!

And, believe it or not, despite more than six months had lapsed since Microsoft BhashaIndia had declared its results, Indic Blogger winners are yet to receive their prizes and trophies from BhashaIndia! Not only that, many winners have not yet been informed officially by BhashaIndia! The winners' list is there at BhashaIndia site making fun of winners like me! I even tried to put my point at their Forum, but they did'nt have courage to accept and publish my post!. Well, I am not in to Microsoft-BhashaIndia-Indic Blogger-Award bashing, but, I am simply comparing the PROFESSIONAL ATTITUDE of BhashaIndia with that of IndiBloggies.

Now, don't you think, despite there is no big patronage behind IndiBloggies, yet, its professionalism makes better award than the Microsoft BhashaIndia Indic Blogger award?

So, why are we waiting for? Lets go IndiBloggies....

.

.

Desi Cartoons...

.
Latest Comments by Adam and Eve on recent Indian News :)


.

.

How to take screen shots of active menus?


.

Taking screen shots of active menus...

There are hundreds of screen capture program both for Windows and Linux. But a real few have capability to capture Application's Active Menus.

Let me explain further. You want to write a small tutorial. For this, you need a few screen shot with application's menu invoked, ready to take mouse click as command. The moment you give command to take screenshot, menu gets disappears too, and you get screenshots sans menus!

To take screenshots with invoked menus, there is a nice, cross platform, graphic program called GIMP. Gimp runs in both Windows and Linux, and using it is very easy. Gimp is basically Gnu Image Manipulation Program, but can also be used as classic screen capture program. Specially, pre-defined screens can be captured automatically.

.

.

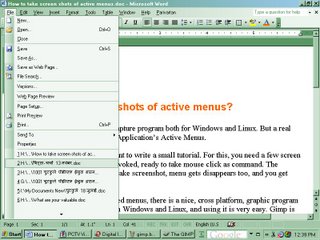
To capture screen with active menus through Gimp, click on File menu of Gimp, then select Acquire>Screenshot. A selection window will appear from where you can choose to capture either entire screen or a window. Set delay for about 20 seconds. Now minimize all the open application including Gimp and open the application's menu (or Windows' menu) that you want to capture, and wait. After 20 seconds, Gimp will capture the screen. The captured screen can be saved in variety of picture file format - including jpg.

Your captured screen may look like this:

Download Gimp for Windows from here

Download Gimp for Linux / Unix from here

Download Gimp for Mac-OS from here

Some real tiny applications for your Windows...

.


What are your valuable, tiny apps?


There was a real good discussion about tiny applications in CNET. More than 800 postings described about their tiny apps, and gave their reasons for using them. I went through most of the list and surprisingly found that many people share my own likings. Here are some tiny applications (all windows based though) which you can really find useful:


.

.


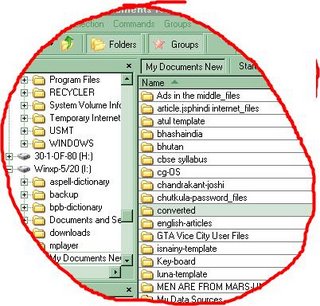
1 ExploreXP - This tiny application is real big in delivering things. As you can see in screenshot, you can make your permanent favorite group folder which you access most often! Further, you can get on the fly folder size information, and many more built-in functionality. Tabbed explorer is great for navigation, and for copy-paste operation. It is, simply, more than Windows Explorer replacement. It is faster than standard windows Explorer. You can download this tiny app from here:

http://www.explorerxp.com/explorerxpsetup.exe

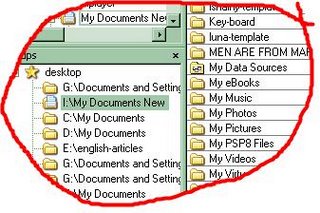
2 Snippy - The irregular shaped screenshots that you are seeing is captured by this tiny screen-capture program Snippy. You can capture any portion of your computer's screen in any shape and size, and use it in any document, outlook, paint and graphics program etc. It has some cool well thought settings through which you can change behavior of this app. The program does not need to be installed. Simply run snippy.exe from any directory of your choice. It sits silently on your system tray until you invoke it to copy a screen portion. A must for anybody who deals in computer graphics.

Download snippy from here:

http://www.bhelpuri.net/Snippy/default.htm

Look ma, Blogger is apoloziging!

.

Blogger's Super Apology!

Due to Blogger's huge usage, grand user-base and equally big database, it always crawls. Things gets worsen when spammers try their dirty tricks on Blogger for some kind of financial (or whatever) gain. On an any given good day, Blogger and its users feel performance bottlenecks on at least two occasions on an average!

Recently, Blogger felt many such turbulences. In such situations, users of Blogger must keep themselves updated through Blogger Status page. It will be a good idea to subscribe to feed of this official Blogger status blog. Follow this URL to subscribe Blogger status:

http://blogger-status.blogspot.com/atom.xml

.

.


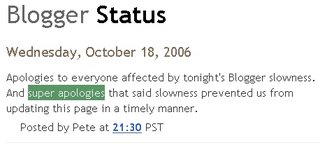
And, do you know, Blogger is real gentle in handling its users? It apologizes every time when some such turbulences and performance bottlenecks occurs at Blogger. And, it APOLOGIZES MORE if it feels problem is grave in nature!

But, when problem became SUPER in nature, then? Blogger SUPER APOLOGIZES!

Adding multiple social bookmark links in a blogpost

.

How to add social bookmark link icons on Blogger blogposts?

Debashish told me that he has added beautiful series of icons of social bookmark sites in his blogpost with the help of a Wordpress plug-in. There is no need for a plug-in for Blogger or Blogspot posts. If you search a little on Google, then you will find dozens of readymade scripts and ready-to-use codes to display social bookmark link icons on a blog post. There are various sites too that lets you create custom code to display any number of social bookmark sites in your blog-post that you can choose from more that a hundred bookmark sites! If you want to use the bookmarks similar as displayed in this blog, then all you have to do is copy post following code in your blogger template at an appropriate location.

Now, you may ask, at which appropriate location? In general, social bookmarking tools were used to bookmark either a particular content, say a blog-post or an entire site such as a blog site. This code is meant to bookmark blog-post (or a certain page on web) and hence is to be placed in template in such a place so that it may appear in every blog-post. The best location will be either at the start or at the end of blog-post. In extreme case, if your template decoration allows you, you can place this in sidebar too! To place this code at the end of blog-post, go to your Blogger template tag </Blogger>. It may look like this:

<!-- End #comments -->

</Blogger>

Now, copy paste following code in between, exactly above the </Blogger> tag.

<p><a href="http://blogmarks.net/my/new.php?mini=1&title=<$BlogItemTitle$>&url=<$BlogItemPermalinkURL$>" title="Blogmark it!"><img src="http://img2.imagepile.net/images/ycc2106/84282833.png" alt="blogmarks" height="16" width="16" /></a> <a href="http://del.icio.us/post?url=<$BlogItemPermalinkURL$>&title=<$BlogItemTitle$>" title="Bookmark at delicious"><img src="http://img2.imagepile.net/images/ycc2106/80727937.png" alt="delicious" height="16" width="16" /></a> <a href="http://digg.com/submit?phase=2&url=<$BlogItemPermalinkURL$>" title="Digg this!"><img src="http://img2.imagepile.net/images/ycc2106/89072042.png" alt="digg" height="16" width="16" /></a> <a href="http://www.furl.net/storeIt.jsp?u=<$BlogItemPermalinkURL$>&t=<$BlogItemTitle$>" title="Bookmark this at Furl"><img src="http://img2.imagepile.net/images/ycc2106/47600014.png" alt="furl" height="16" width="16" /></a> <a href="http://www.google.com/bookmarks/mark?op=add&bkmk=<$BlogItemPermalinkURL$>&title=<$BlogItemTitle$>" title="Bookmark this at Google"><img src="http://img2.imagepile.net/images/ycc2106/10847106.png" alt="google" height="16" width="16" /></a> <a href="http://www.netvouz.com/action/submitBookmark?url=<$BlogItemPermalinkURL$>&title=<$BlogItemTitle$>&popup=no" title="Bookmark this at netvouz"><img src="http://img2.imagepile.net/images/ycc2106/47445448.png" alt="netvouz" height="16" width="16" /></a> <a href="http://www.newsvine.com/_tools/seed&save?u=<$BlogItemPermalinkURL$>&h=<$BlogItemTitle$>" title="Bookmark this at newsvine" ><img src="http://img2.imagepile.net/images/ycc2106/27563199.png" alt="newsvine" height="16" width="16" /></a> <a href="http://reddit.com/submit?url=<$BlogItemPermalinkURL$>&title=<$BlogItemTitle$>" title="Bookmark this at reddit"><img src="http://img2.imagepile.net/images/ycc2106/10796749.png" alt="reddit" height="16" width="16" /></a> <a href="http://www.spurl.net/spurl.php?url=<$BlogItemPermalinkURL$>&title=<$BlogItemTitle$>" title="Bookmark this at spurl!"><img src="http://img2.imagepile.net/images/ycc2106/67105361.png" alt="spurl" height="16" width="16" /></a> <a href="http://technorati.com/faves?add=<$BlogItemPermalinkURL$>" title="Bookmark this at technorati" ><img src="http://img2.imagepile.net/images/ycc2106/81723336.png" alt="Technorati" height="16" width="16" /></a></p>

Now your blog template's this section will look like this:

<!-- End #comments -->

<p><a href="http://blogmarks.net/my/new.php?mini=1&title=<$BlogItemTitle$>&url=<$BlogItemPermalinkURL$>" title="Blogmark it!"><img src="http://img2.imagepile.net/images/ycc2106/84282833.png" alt="blogmarks" height="16" width="16" /></a> <a href="http://del.icio.us/post?url=<$BlogItemPermalinkURL$>&title=<$BlogItemTitle$>" title="Bookmark at delicious"><img src="http://img2.imagepile.net/images/ycc2106/80727937.png" alt="delicious" height="16" width="16" /></a> <a href="http://digg.com/submit?phase=2&url=<$BlogItemPermalinkURL$>" title="Digg this!"><img src="http://img2.imagepile.net/images/ycc2106/89072042.png" alt="digg" height="16" width="16" /></a> <a href="http://www.furl.net/storeIt.jsp?u=<$BlogItemPermalinkURL$>&t=<$BlogItemTitle$>" title="Bookmark this at Furl"><img src="http://img2.imagepile.net/images/ycc2106/47600014.png" alt="furl" height="16" width="16" /></a> <a href="http://www.google.com/bookmarks/mark?op=add&bkmk=<$BlogItemPermalinkURL$>&title=<$BlogItemTitle$>" title="Bookmark this at Google"><img src="http://img2.imagepile.net/images/ycc2106/10847106.png" alt="google" height="16" width="16" /></a> <a href="http://www.netvouz.com/action/submitBookmark?url=<$BlogItemPermalinkURL$>&title=<$BlogItemTitle$>&popup=no" title="Bookmark this at netvouz"><img src="http://img2.imagepile.net/images/ycc2106/47445448.png" alt="netvouz" height="16" width="16" /></a> <a href="http://www.newsvine.com/_tools/seed&save?u=<$BlogItemPermalinkURL$>&h=<$BlogItemTitle$>" title="Bookmark this at newsvine" ><img src="http://img2.imagepile.net/images/ycc2106/27563199.png" alt="newsvine" height="16" width="16" /></a> <a href="http://reddit.com/submit?url=<$BlogItemPermalinkURL$>&title=<$BlogItemTitle$>" title="Bookmark this at reddit"><img src="http://img2.imagepile.net/images/ycc2106/10796749.png" alt="reddit" height="16" width="16" /></a> <a href="http://www.spurl.net/spurl.php?url=<$BlogItemPermalinkURL$>&title=<$BlogItemTitle$>" title="Bookmark this at spurl!"><img src="http://img2.imagepile.net/images/ycc2106/67105361.png" alt="spurl" height="16" width="16" /></a> <a href="http://technorati.com/faves?add=<$BlogItemPermalinkURL$>" title="Bookmark this at technorati" ><img src="http://img2.imagepile.net/images/ycc2106/81723336.png" alt="Technorati" height="16" width="16" /></a></p>

</Blogger>

Save the template changes, then republish entire blog. And, you are done!

.

.

You can use this very code in Blogger's other language blogs by incorporating slight change in code. You need to translate text to be displayed in specific language, which you can find under 'title' and 'alt' tags. For example, for Hindi (India) language, you can use following code: (You need to set your browser 's encoding to View>Unicode/UTF-8 to see Hindi text)

<p><a href="http://blogmarks.net/my/new.php?mini=1&title=<$BlogItemTitle$>&url=<$BlogItemPermalinkURL$>" title="इसे ब्लॉगमार्क पर पुस्तचिह्नित करें"><img src="http://img2.imagepile.net/images/ycc2106/84282833.png" alt="ब्लॉगमार्क" height="16" width="16" /></a> <a href="http://del.icio.us/post?url=<$BlogItemPermalinkURL$>&title=<$BlogItemTitle$>" title="इसे डेलिशियस पर पुस्तचिह्नित करें"><img src="http://img2.imagepile.net/images/ycc2106/80727937.png" alt="डेलिशियस" height="16" width="16" /></a> <a href="http://digg.com/submit?phase=2&url=<$BlogItemPermalinkURL$>" title="इसे डिग पर पुस्तचिह्नित करें!"><img src="http://img2.imagepile.net/images/ycc2106/89072042.png" alt="डिग" height="16" width="16" /></a> <a href="http://www.furl.net/storeIt.jsp?u=<$BlogItemPermalinkURL$>&t=<$BlogItemTitle$>" title="इसे फ़र्ल पर पुस्तचिह्नित करें"><img src="http://img2.imagepile.net/images/ycc2106/47600014.png" alt="फ़र्ल" height="16" width="16" /></a> <a href="http://www.google.com/bookmarks/mark?op=add&bkmk=<$BlogItemPermalinkURL$>&title=<$BlogItemTitle$>" title="इसे गूगल पर पुस्तचिह्नित करें"><img src="http://img2.imagepile.net/images/ycc2106/10847106.png" alt="गूगल" height="16" width="16" /></a> <a href="http://www.netvouz.com/action/submitBookmark?url=<$BlogItemPermalinkURL$>&title=<$BlogItemTitle$>&popup=no" title="इसे नेटवाअज़ पर पुस्तचिह्नित करें"><img src="http://img2.imagepile.net/images/ycc2106/47445448.png" alt="नेटवाअज़" height="16" width="16" /></a> <a href="http://www.newsvine.com/_tools/seed&save?u=<$BlogItemPermalinkURL$>&h=<$BlogItemTitle$>" title="इसे न्यूज़वेइन पर पुस्तचिह्नित करें" ><img src="http://img2.imagepile.net/images/ycc2106/27563199.png" alt="न्यूज़वेइन" height="16" width="16" /></a> <a href="http://reddit.com/submit?url=<$BlogItemPermalinkURL$>&title=<$BlogItemTitle$>" title="इसे रेडिट पर पुस्तचिह्नित करें"><img src="http://img2.imagepile.net/images/ycc2106/10796749.png" alt="रेडिट" height="16" width="16" /></a> <a href="http://www.spurl.net/spurl.php?url=<$BlogItemPermalinkURL$>&title=<$BlogItemTitle$>" title="इसे स्पर्ल पर पुस्तचिह्नित करें!"><img src="http://img2.imagepile.net/images/ycc2106/67105361.png" alt="स्पर्ल" height="16" width="16" /></a> <a href="http://technorati.com/faves?add=<$BlogItemPermalinkURL$>" title="इसे टेक्नोराती पर पुस्तचिह्नित करें" ><img src="http://img2.imagepile.net/images/ycc2106/81723336.png" alt="टेक्नोराती" height="16" width="16" /></a></p>

If you do not like this readymade code then you can hunt in the following links for more customized solutions -

3spots

pro-seo

blogfresh

elamb

bookmarkz

You can get readymade bookmark plug-in for Wordpress blog from here:

WP Notable

Finally, a warning- the tip describe above can be used in any blog template, but there is absolutely no guarantee from writer of this post. And, kindly note this - please make a backup copy of your blog template before making any change in your blog template. Blogger becomes menace at times!

Best wishes for your blog's bookmarkings!